Designing your dream yard doesn't have to cost thousands or require professional help. By following a clear plan and using free tools like InstantInterior AI, you can create a stunning outdoor space while saving 40–60% on labor costs. Here's a quick breakdown of the process:
- Step 1: Assess Your Space
Measure your yard, map sunlight, check drainage, and note features like trees or slopes. - Step 2: Define Your Goals
Decide your yard’s purpose - entertainment, privacy, play area, or curb appeal. - Step 3: Find Your Style
Use InstantInterior AI to visualize over 20 landscape styles tailored to your yard. - Step 4: Plan Your Layout
Divide your yard into zones (seating, garden, pathways) and sketch focal points. - Step 5: Choose Plants and Materials
Pick climate-suitable plants, budget-friendly materials, and low-maintenance options. - Step 6: Refine Your Design
Adjust layouts and test variations with InstantInterior AI before buying materials. - Step 7: Execute in Phases
Break the project into manageable steps: start with infrastructure, then add plants and details.
Avoid common mistakes like skipping planning, impulse-buying plants, or underestimating maintenance. With tools like InstantInterior AI, you can visualize your design, avoid costly errors, and create a yard that fits your vision and budget. Start your DIY project today - no credit card required.

7-Step DIY Landscape Design Process: From Assessment to Execution
How to make a landscape design 🪴 THE STEPS 🪴 Plus DIY tips for a first time landscape design
sbb-itb-4214aae
Step 1: Assess Your Space
Before diving into your landscaping project, it's crucial to gather all the necessary measurements and environmental details. This step helps you avoid costly mistakes, like choosing plants that won't survive in your yard or creating hardscapes that don't fit properly.
Measure and Map Your Yard
Start by measuring your yard with a tape measure. Create a scaled map on graph paper, including your house, property lines, and any existing features. This map will be your go-to guide for making decisions as you plan your landscape design.
Be sure to mark the compass orientation on your map. Knowing where north is helps you track how sunlight moves across your yard throughout the day. Also, highlight the locations of doors and windows to ensure your landscape enhances access points and interior views. Don’t forget to identify and mark any utility lines before finalizing plans that involve digging.
"A good backyard landscaping plan isn't just a pretty picture - it's a decision-making tool that tells you exactly what to buy, where to put it, and in what order to install it." - Yardcast
Check Sunlight, Drainage, and Existing Features
Understanding sunlight patterns is key. Observe your yard at different times - morning, midday, and late afternoon - to determine sun exposure. Full sun areas get 6 or more hours of direct light, part sun areas receive 3–6 hours, and shaded spots get less than 3 hours. Mark these zones on your map so you can choose plants suited to each area.
Next, evaluate your yard's drainage. After it rains, check for spots where water pools or flows. Dig a few inches into the soil in various areas to test its drainage - soil should be pliable and not overly compacted or waterlogged. If your yard has steep slopes, make a note of them, as you may need to address these with terracing or retaining walls before planting.
Finally, take stock of permanent features like trees, large rocks, patios, or fences. Decide which ones you'll keep, remove, or work around . These features often serve as focal points in your design and can influence where new plants or hardscapes go. Identifying what stays and what goes also helps you avoid unexpected expenses - 92% of users reportedly succeed in creating their ideal design on the first attempt.
Once you've mapped out your yard’s unique characteristics, you'll be ready to move on to defining your design goals in the next step.
Step 2: Define Your Goals
Now that your yard is mapped out, it’s time to figure out what you want from the space. This step helps you avoid feeling overwhelmed and ensures your design fits how you’ll actually use the yard - not just how you imagine it should look.
Identify Your Priorities
Start by deciding what your yard’s main purpose will be. Do you want an entertainment hub with a patio and fire pit to host friends? Or maybe a private retreat with lush greenery and a calming water feature? Perhaps you’re looking for a play area for kids and pets, or you’re focused on curb appeal to enhance your home’s value. Knowing your priorities helps you focus your budget on what matters most.
Here’s how common goals often translate into design choices:
- Entertainment spaces: Think dining areas, outdoor kitchens, or cozy fire pits for social gatherings.
- Low-maintenance yards: Opt for climate-appropriate plants and simple hardscapes like gravel paths.
- Privacy-focused designs: Invest in fences, pergolas, or tall hedges to create a secluded space.
- Functional yards: Consider vegetable gardens or terraced designs for sloped areas.
"The AI landscape design solved our sloped yard nightmare. The terraced design with accurate cost estimates let us plan the project properly. Contractors loved the detailed plans." - Robert Garcia, Homeowner
Zero in on one or two features that will make the biggest difference in your daily life. If summer barbecues are your thing, prioritize a patio over a decorative front yard. If your yard has tricky slopes, focus on fixing drainage and terracing before thinking about plants or décor.
Once you’ve nailed down your priorities, it’s time to match them to a budget that works for you.
Set a Realistic Budget
DIY landscaping projects typically cost between $1,000 and $5,000, depending on the size of the project and the materials you choose. Planning ahead helps you avoid expensive mistakes, like buying plants that don’t thrive in your climate or building a patio that’s too small for your needs.
Hiring a professional landscape designer can cost between $1,500 and $3,000, but that’s money you could put directly into materials instead. Break your budget into categories like hardscaping, softscaping, and additional features, and track every item on a materials list to ensure you know exactly what you’re spending.
If your dream yard is out of reach financially, consider phasing the project. Start with the essentials, such as patios and pathways, and add plants or decorative features later. Spreading out the costs over multiple seasons gives you time to adjust your plan as needed. The key is to have a complete vision from the start, even if you tackle it in steps.
With clear goals and a well-thought-out budget, you’re ready to dive into design styles using InstantInterior AI.
Step 3: Find Your Style
Tired of scrolling endlessly for ideas? Imagine seeing your yard completely transformed in just seconds.
Use InstantInterior AI to Explore Styles

With InstantInterior AI, you can upload a clear photo of your yard and instantly generate over 20 landscape styles in less than a minute. The tool creates photorealistic transformations of your actual space, showcasing styles like modern minimalist, Mediterranean, cottage garden, xeriscape, Zen, and more. By overlaying virtual plants, hardscapes, and other features onto your photo, it lets you see how each design would look in your yard.
An impressive 92% of users find their dream landscape design on their first attempt with this AI tool. It even analyzes your yard's unique features - like existing structures, slopes, and layout - so the designs are tailored to fit your space without any guesswork.
"It was really easy and eye-opening to see the potential at no cost." - Valaria P., Homeowner
Choose the Right Style for Your Space
InstantInterior AI allows you to compare multiple styles side by side, whether you're drawn to minimalist designs, lush traditional landscapes, or a climate-friendly xeriscape. The photorealistic designs make it easier to pick a style that complements your yard’s unique conditions and your home's architecture.
When deciding, consider four key factors: yard size, USDA hardiness zone, sun exposure, and primary use. For instance:
- A modern minimalist style is perfect for compact urban yards under 600 square feet.
- Larger spaces benefit from a naturalistic design with native plants, ideal for low-maintenance landscaping.
- If your yard gets full sun all day, Mediterranean or xeriscape styles not only look stunning but also require less water once established.
Once you’ve chosen your style, you’ll be ready to plan a layout that brings your vision to life.
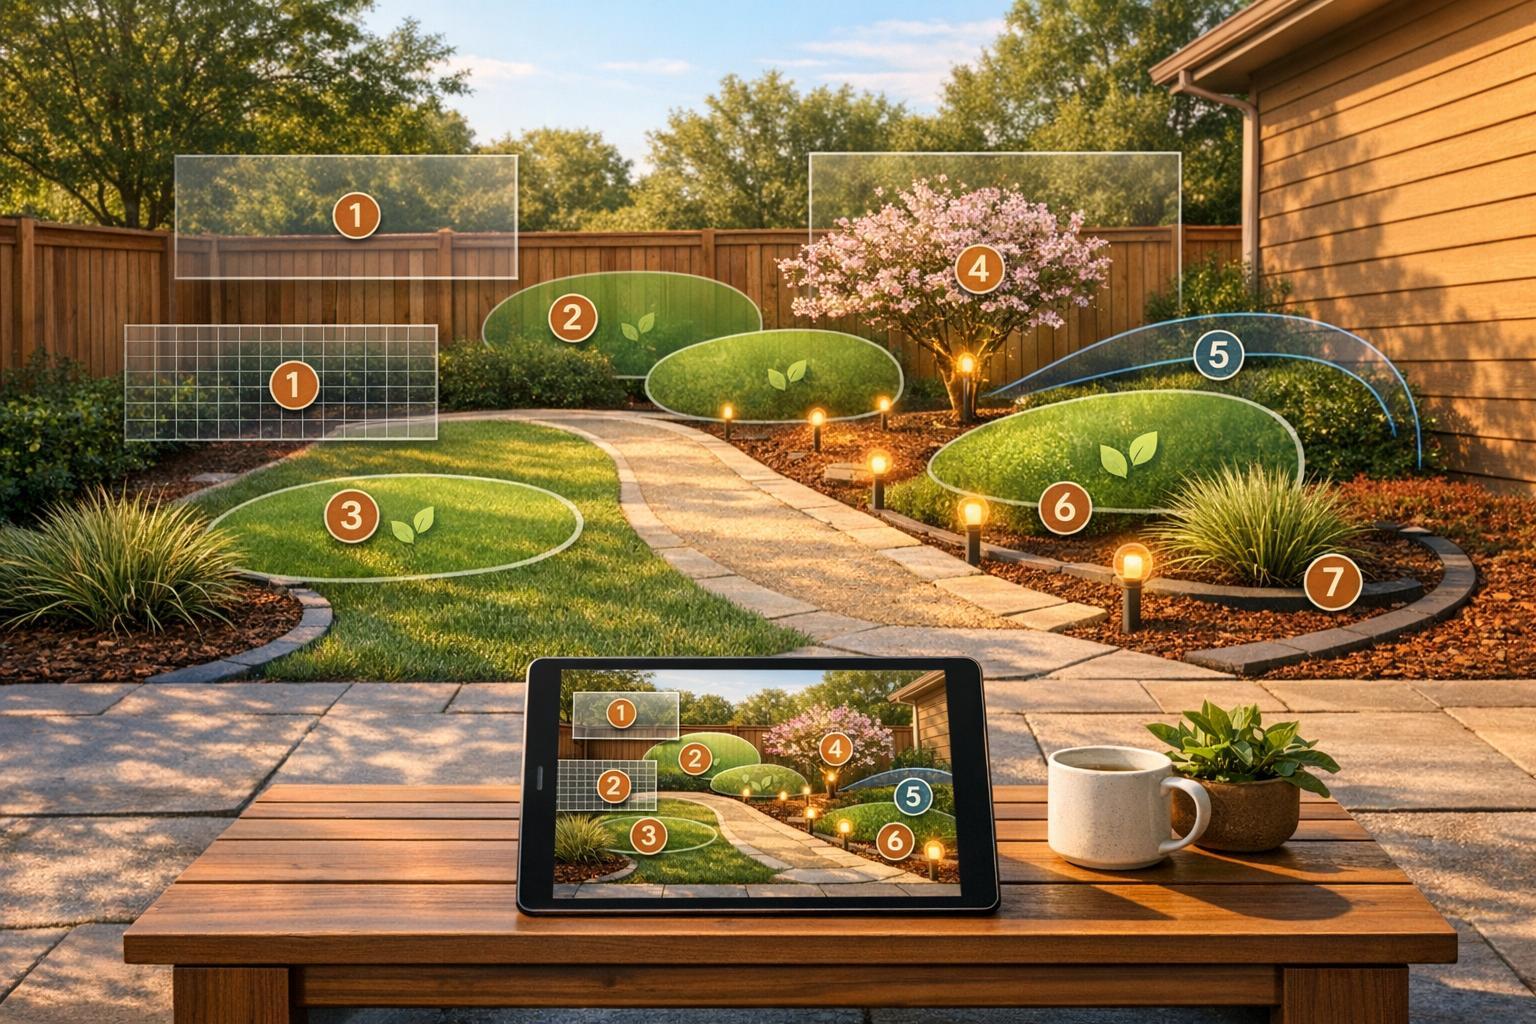
Step 4: Plan Your Layout
Now that you've settled on your style, it’s time to bring that vision to life with a practical layout. This is where your yard transforms from a blank canvas into a purposeful space that matches your lifestyle.
Divide Your Yard into Zones
Think of your yard as a collection of outdoor zones, each with its own function. Start by listing everything you need and want - whether it’s a washing line, tool storage, a fire pit, or a vegetable garden. Assign each of these functions to specific zones based on the natural layout of your yard.
For example, place seating and dining areas near your kitchen for easy access when carrying food and drinks. Locate your vegetable garden in the sunniest area with convenient water access. Set up relaxation spots in more secluded corners for privacy, and keep service areas like compost bins or trash storage out of sight, perhaps in side yards or behind hedges or fencing.
To maintain a unified look, limit yourself to no more than three hardscaping materials - such as gravel, stone, or brick - across all zones. Once your zones are defined, the next step is to connect them with clear pathways. A free design tool can help you visualize these zones and ensure everything flows seamlessly before finalizing your layout.
Sketch Pathways and Focal Points
With your zones mapped out, it’s time to design pathways that guide movement and highlight key features. Start by sketching your main pathways before planting or placing furniture. For a comfortable flow, aim for paths that are 4 feet wide, or 5 feet if they connect different levels.
Focal points help define each zone and draw the eye. These could be anything from a striking Japanese Maple or a water feature to a fire pit or a simple bench placed at the end of a path . Use your pathways to naturally lead visitors toward these focal points. In more formal designs, place focal points centrally with symmetrical elements around them. For a relaxed, informal feel, position them slightly off-center and use curved paths.
To pull the design together, repeat certain elements across zones. For instance, use the same type of ornamental grass in multiple areas or stick to one paver material for all your pathways. This repetition creates a visual connection between zones, ensuring your yard feels cohesive even as each area serves a distinct purpose.
Step 5: Choose Plants and Materials
Now that your layout is ready, it’s time to pick the plants and materials that will bring your outdoor vision to life. Thoughtful choices here can help you create a yard that’s beautiful and easy to maintain, rather than one that constantly needs your attention.
Choose Plants That Suit Your Climate
Start by identifying your USDA hardiness zone (you can use planthardiness.ars.usda.gov for this). This will help you choose plants that can handle your region’s winters. Next, observe how much sunlight different areas of your yard get throughout the day. Classify these spots as Full Sun (6+ hours), Part Sun (3–6 hours), or Shade (less than 3 hours).
If you’re aiming for low-maintenance landscaping, native plants are a smart choice. Once established, they typically need less water and fertilizer while also supporting local ecosystems. For inspiration, here are some regional native plant suggestions:
- Northeast: Black-eyed Susan, coneflower, native asters
- Midwest: Prairie dropseed, native milkweed
- Southeast: Coral honeysuckle, muhly grass
- Pacific Northwest: Sword fern, Oregon grape
For privacy, consider fast-growing options like Leyland cypress or Thuja Green Giant, which can grow 3–5 feet a year. Keep in mind that larger trees and shrubs take time - sometimes 5–15 years - to reach full size, so planting them early is key.
Once you’ve chosen plants that fit your climate and yard’s sunlight conditions, it’s time to think about hardscape materials that will tie everything together.
Select Materials That Fit Your Budget and Style
Hardscape materials set the tone for your yard, so think about your style preferences and budget. If you’re looking for affordable options, gravel, mulch, and poured concrete are low-maintenance and wallet-friendly. For specific design styles, consider:
- Modern: Charcoal gray concrete pavers
- Mediterranean: Travertine and terra cotta
- Zen-inspired: Decomposed granite and irregular flagstone
Focus on permanent elements like patios and retaining walls first, since these define your space and are harder to change later. If you’re working within a tight budget, opt for smaller plants like 1-gallon perennials - they’ll grow to full size within a season or two. Another way to save is by tackling installation yourself, which can cut labor costs by 40–60%.
Before making any purchases, take advantage of a free design tool to test out different combinations of plants and materials. This allows you to refine your vision and avoid costly mistakes.
Step 6: Refine Your Design with InstantInterior AI
Now that you've selected your plants and materials, it's time to fine-tune your layout using a free tool. Before making any purchases at the nursery, InstantInterior AI lets you visualize your design and make adjustments.
Test Design Variations
With InstantInterior AI, you can upload a photo of your yard and experiment with styles like Modern, Mediterranean, Farmhouse, or Xeriscape. Instead of guessing what these styles might look like, the tool generates 4K photorealistic renderings in under 90 seconds. This means you can see exactly how each aesthetic transforms your space.
Want to tweak your design? Just type commands like "add a fire pit", "move the pathway left", or "switch to a nighttime view". You can adjust hardscapes, rearrange plant groupings, and preview different layouts - all before spending a dime. The free plan even includes starter credits to get you going.
This instant feedback sets you up for a smooth execution of your landscaping project.
Save Time and Avoid Mistakes
Previewing every detail ensures precision and helps you avoid costly errors. In fact, data shows that 92% of users who try AI landscape tools end up creating their ideal design on the first attempt. By refining your design now, you can align every step of your project with your DIY vision while keeping expenses under control.
Maria Santos, a homeowner, shared her experience:
"I handed the landscape design plan straight to my contractor. He said it was better than most professional landscaping designs he's seen".
These photorealistic renderings aren’t just for you - they’re a powerful tool for getting accurate quotes from contractors. They also help you prioritize your project by starting with the zones that will make the biggest impact. Another homeowner, Sarah Johnson, highlighted:
"The AI landscape design was detailed. The landscape design cost estimates were spot-on - saved me from budget surprises! I knew exactly what to expect before starting".
Step 7: Execute Your Design in Phases
Once you’ve refined your design with InstantInterior AI, it’s time to bring your vision to life - step by step. You don’t need to tackle your entire landscape project in one weekend or even one season. Breaking the work into phases not only makes the process more manageable but also helps spread costs over time. By using InstantInterior AI throughout, you can adjust your plans as needed to keep everything on track. Garden designer Angela Collins highlights the importance of starting with the basics: "The single most important thing you can do for your garden is to consider the preparation of soil". Focusing on foundational work first naturally supports a phased approach.
Break the Project into Phases
Start with Phase 1: Infrastructure and Foundation. This includes prepping the soil, fixing drainage issues, and setting up hardscape elements like patios, pathways, and fences. These foundational steps are crucial for long-term success. Proper soil preparation, in particular, ensures that your plants will thrive well into the future.
Move on to Phase 2: Major Focal Points after the foundation is ready. This phase involves adding larger elements like trees, pergolas, water features, or gazebos. If you’re planning outdoor seating areas, prioritize locations near the house, ideally with a southwest-facing view, to make the space functional early on.
Wrap up with Phase 3: Softscapes and Details. This is where you’ll add perennials, shrubs, and decorative accents to fill out the design. Tackling these elements last allows you to see how the bigger pieces come together before finalizing the smaller details.
Set Realistic Timelines
Once you’ve outlined your phases, set a timeline that works for you. Plan to spend $500–$1,000 per phase, which keeps the project affordable and avoids unnecessary financial strain. Spread the work over several months or even multiple seasons - there’s no need to rush. As DIY homeowner Tom Richardson shared: "The landscaping cost breakdown helped me plan my budget perfectly and build in phases".
Be mindful of lead times for materials. For example, plants can take 4–6 weeks to arrive, while custom pavers might require 8–12 weeks. Align your schedule with these timelines to avoid delays. Remember, thoughtful landscaping often pays for itself within eight years through energy savings alone. Taking your time doesn’t just make the process easier - it ensures you’re building something that lasts. Plus, InstantInterior AI can help you tweak your plans as you move through each phase.
Common DIY Landscaping Mistakes to Avoid
Tackling a DIY landscaping project can be exciting, but it’s easy to make mistakes that cost both time and money. The good news? Most of these errors are completely avoidable with a little foresight. Let’s look at three common missteps and how to steer clear of them.
Skipping the Planning Phase
Diving into landscaping without a clear plan might seem tempting, but it often leads to chaos. Without assessing your space, you risk placing plants and features in the wrong spots, creating a yard that doesn’t function well or looks disjointed. Worse yet, you might end up spending extra to fix these issues later. Professional landscape design services typically range from $1,500–$3,000, so skipping your planning phase could mean paying for help down the line to undo preventable mistakes.
Instead, start with a simple map of your yard. Mark property lines, track how sunlight and shade shift throughout the day, and note existing features like trees or utility boxes. This groundwork ensures you’re set up for success and minimizes the chance of costly re-dos later.
Buying Plants Without a Design
Impulse-buying plants might feel fun, but it often leads to overcrowding, mismatched styles, or plants that just don’t thrive in your local climate. Garden Designer Whitney Laritson from Nature Hills explains the problem perfectly:
"If you space them out according to how big they are when planting, you might find one summer day that they've grown into each other to form one massive blob."
To avoid this, check the plant tags for their mature height and width. Space them at about two-thirds of their mature spread to allow for natural growth without overcrowding. If you’re unsure how your choices will look together, tools like InstantInterior AI can simulate plant placements digitally, giving you a preview of how your yard will evolve over time.
And don’t forget to think about maintenance! A well-designed yard isn’t just about aesthetics - it’s also about how much time and effort you’ll need to keep it looking great.
Underestimating Maintenance
Choosing plants that require more care than you can realistically provide is a recipe for frustration. Without proper planning, you might end up with dead plants, wasted money, and a yard that feels more like a burden than a joy. To keep things manageable, group plants with similar care needs together. This makes watering and maintenance much easier.
If your weekly yard work time is limited to just a few hours, opt for low-maintenance options like Daylilies, Goldmound Spirea, or Karl Foerster Feather Reed Grass. Adding a 3-inch layer of mulch can also help retain moisture and cut down on weeding chores. For a polished look, plant in odd-numbered groupings (three, five, or seven) to create visual balance while simplifying care.
And don’t forget, tools like InstantInterior AI can help you test different plant combinations and designs before you commit, ensuring your yard matches both your style and your schedule.
Taking these steps - and leveraging helpful tools - can help you avoid these common pitfalls and create a landscape you’ll love for years to come.
Conclusion: Start Your DIY Landscaping Project Today
Your plan is ready - it's time to dive in. You don't need a professional or a degree to completely transform your yard. With this free tool, you can design a landscape you’ll love while avoiding unnecessary expenses and guesswork.
InstantInterior AI gives you a head start in less than 90 seconds. Just upload a photo, explore various styles, and visualize your ideal space before spending money on materials or plants.
With 92% of users achieving their dream design on the first try, this tool sets you up for success. It simplifies every step, from evaluating your space to breaking the project into manageable phases. Say goodbye to decision overload and costly errors - this tool turns your ideas into an actionable plan.
Take the next step today: Upload your photo and start designing for free. No credit card required, no strings attached - just a straightforward way to bring your vision to life.
FAQs
What photo works best in InstantInterior AI?
For the best results, choose a high-quality, well-lit photo that clearly showcases your room or space. Proper lighting and sharp details allow the AI to analyze your area more effectively, leading to accurate and personalized design suggestions. Be sure your photo includes the entire space you want to work on for the best possible outcome.
How do I fix drainage before planting?
Fixing drainage problems is a must before you start planting. Begin by checking the slope of your yard. Ideally, the soil should slope away from your house and planting areas at a 1–2% gradient. To manage water effectively, you can use solutions like gravel, permeable pavers, or French drains (trenches filled with gravel and perforated pipes). For surface runoff, options like channel drains or rain barrels can help. Tackling these issues upfront ensures better water management and healthier plants.
Do I need permits for patios or retaining walls?
Whether you need a permit for your patio or retaining wall depends on your local regulations and the scope of your project. It's always a good idea to check with your local building department or municipal office to clarify the requirements.
Taking this step ensures your project complies with zoning laws and helps you avoid fines or expensive modifications down the line. Before you dive into your DIY plans, make sure everything is squared away to keep your project both safe and legal.